This is a report about fixed bugs in the last weeks.
The most important thing belongs to the ToMany relationship.
The bug: If you delete an child from the list and save the parent, the relatonship to the child was not deleted in the databases.
The APersistExample app shows that APersist is able to handle this now.
You can find it here.
Other bugs:
Objects with ToOne relationship can not be updated => fixed
Boolean is not supported => fixed
Update throws exception => fixed
Download APersist and try it => APerist
Mittwoch, 10. Juni 2015
Sonntag, 24. Mai 2015
APersist - ToMany relationships
Hello, hello.
I have been working on the apersist-orm-framework. And now I want to show you a new feature coming up in the next days.
I am talking about toMany relations in a database.
The example I want to use has also to do with persons, like in the previous post (see: http://androidappexperience.blogspot.de/2015/05/apersist-easy-annotate-and-persist.html)
Now I want to show how you can add telephone numbers to this persons.
Annotations you need to do this:
This is the "ToMany" annotation.
If you have a look to the documentation of this annotation, you will see that there is a field you have to fill in. I am talking about the "target()" field. This field returns the persistence class you want to point to in this relationship.

So for the example we already have the persistence classe "Person" and the "PersonDAO". For the telephone number we also need a persistence class and a DAO. (see below)
Additionally you have to register the new DAO in the DBRegistry.
And the most important step is to connect the "Person" with "TelephoneNumbers". Therefore you create a new field in "Person" This field has to be iterable . You also have to annotate it with "ToMany" like in the listing below.
So if you did all these things you will be able to persist persons with many telephone numbers.
Look at the example app to check out if it works.
I have been working on the apersist-orm-framework. And now I want to show you a new feature coming up in the next days.
I am talking about toMany relations in a database.
The example I want to use has also to do with persons, like in the previous post (see: http://androidappexperience.blogspot.de/2015/05/apersist-easy-annotate-and-persist.html)
Now I want to show how you can add telephone numbers to this persons.
Annotations you need to do this:
- @PersistenceClass
- @Table
- @Column
- @Id
- @ToMany
This is the "ToMany" annotation.
If you have a look to the documentation of this annotation, you will see that there is a field you have to fill in. I am talking about the "target()" field. This field returns the persistence class you want to point to in this relationship.

So for the example we already have the persistence classe "Person" and the "PersonDAO". For the telephone number we also need a persistence class and a DAO. (see below)
@PersistenceClass
public class TelephoneNumber {

 @Id(autoincrement = true)
 private Long id;

 @Column
 private Long number;

 public Long getId() {
  return id;
 }

 public void setId(Long id) {
  this.id = id;
 }

 public Long getNumber() {
  return number;
 }

 public void setNumber(Long number) {
  this.number = number;
 }

 @Override
 public String toString() {
  return String.valueOf(number);
 }
}


public class TelephoneNumberDao extends DAO {

 public TelephoneNumberDao() {
  super();
 }

 public TelephoneNumberDao(Database db) {
  super(db);
 }

 @Override
 protected Class getParameterType() {
  return TelephoneNumber.class;
 }

}
Additionally you have to register the new DAO in the DBRegistry.
public class ExampleDbRegistry extends DbRegistry {

 @Override
 protected void setup() {
  add(PersonDao.class, Person.class);
  add(TelephoneNumberDao.class, TelephoneNumber.class);
 }

}
And the most important step is to connect the "Person" with "TelephoneNumbers". Therefore you create a new field in "Person" This field has to be iterable . You also have to annotate it with "ToMany" like in the listing below.
@PersistenceClass
@Table(name = "Persons")
public class Person {

 @Id(autoincrement = true)
 private Long id;

 @Column
 private String firstname;

 @Column
 private String lastname;

 @ToMany(target = TelephoneNumber.class)
 private List teleNumber;


 public Long getId() {
  return id;
 }

 public void setId(Long id) {
  this.id = id;
 }

 public String getFirstname() {
  return firstname;
 }

 public void setFirstname(String firstname) {
  this.firstname = firstname;
 }

 public String getLastname() {
  return lastname;
 }

 public void setLastname(String lastname) {
  this.lastname = lastname;
 }

 public List getTeleNumber() {
  if(teleNumber == null)
   teleNumber = new ArrayList();
  return teleNumber;
 }

 public void setTeleNumber(List teleNumber) {
  this.teleNumber = teleNumber;
 }

 @Override
 public String toString() {
  return firstname + " " + lastname;
 }
}
So if you did all these things you will be able to persist persons with many telephone numbers.
Look at the example app to check out if it works.
Lookup sources: github.com/gundermann/APersist
Lookup example: Example
Freitag, 8. Mai 2015
APersist - Easy annotate and persist
APersist is another ORM-Framework which works with annotations.
Here I will show you a simple setup example for APersist. The example is a databases of persons.
Please notice that the design is not completed so there will be several changes in future.
You will find the exmaple on APersistExample.
APersist is now available on github: APersist
Here I will show you a simple setup example for APersist. The example is a databases of persons.
Please notice that the design is not completed so there will be several changes in future.
You will find the exmaple on APersistExample.
APersist is now available on github: APersist
- Import APersist as library-project into you Android-Project
- You have to create the POJOs youneed for you application.
In the example we will need a class called Person. This classes we have to annotate with the Annotations provided from APersist. Those are:
- @PersistenceClass
- @Table
- @Column
- @Id
So Person which is save in table Persons will looks like this:
@PersistenceClass
@Table(name = "Persons")
public class Person {

 @Id(autoincrement = true)
 private Long id;

 @Column
 private String firstname;

 @Column
 private String lastname;

 public Long getId() {
  return id;
 }

 public void setId(Long id) {
  this.id = id;
 }

 public String getFirstname() {
  return firstname;
 }

 public void setFirstname(String firstname) {
  this.firstname = firstname;
 }

 public String getLastname() {
  return lastname;
 }

 public void setLastname(String lastname) {
  this.lastname = lastname;
 }

}
Don't forget to generate getters and setters for every annotated field ;-) - To get access of the data in database you need DAOs. So the next step is to implement the PersonDao which is very easy. APersist provides therefore a generic class called DAO. There is just one method you have to implement. This method - getParameterType() - has to return the class-object of the connected PersistenceClass.
So the PersonDao will look like this:
public class PersonDao extends DAO
DON'T FORGETT THE DEFAULT CONSTRUCTOR IN DAO-CLASSES!!!<Person> { public PersonDao() { } public PersonDao(DatabaseImpl db) { super(db); } @Override protected Class getParameterType() { return Person.class; } } } - In the next step you have to register the corresponding Dao and his PersistenceClass in an Registry. Therefore APersist provides another abstract class called DbRegistry. If you inherit from this class you have to implement the method setup. There you can add pairs of Dao and PersistenceClass with the method add.
So the ExampleDbRegistry will looks like this:
public class ExampleDbRegistry extends DbRegistry { @Override protected void setup() { add(PersonDao.class, Person.class); } } - In order to create a database you have to call the constructor of DatabaseImpl
- Handle DAOs to insert, delete, select or update data from database.
In the example you will find the code which accesses the DAOs in the MainActivity. There is one method which deletes a person from database and another which adds a person to database.
private void updateList() { ListView personList = (ListView) findViewById(R.id.list); Listpersons = getApp().getPersonDao().loadAll(); personList.setAdapter( new PersonAdapter(this, persons)); personList.setOnItemLongClickListener( new DeletePersonListener(this)); } @Override public void addPerson(String firstName, String lastName) { Person person = new Person(); person.setFirstname(firstName); person.setLastname(lastName); getApp().getPersonDao().insertOrUpdate(person); updateList(); } @Override public void delete(Person person) { getApp().getPersonDao().delete(person); updateList(); }
The other code around is just needed for the app. You also can try it in an emulator and have a look to the database with sqlite3.
new DatabaseImpl(Context, DatabaseName, DbRegistry, Version);
The variable Context is the application contex. DatabaseName is obviously the name of the databas. The DbRegistry is an isntance of your own registry. And the version is an integer which represents the version number of the database. So if you change anything which influence the structure of the databases, please increment the version variable.
So in the example it will looks like this:
public class ExampleApplication extends Application {

 private DatabaseImpl db;
 private PersonDao personDao;
 private int version = 1;

 public PersonDao getTaskDao() {
  if (personDao == null)
   personDao = new PersonDao(getDB());
  return personDao;
 }

 private DatabaseImpl getDB() {
         if (db == null){
                db = new DatabaseImpl(this,
                            "Example.db", getDbRegistry(),
                             version);
         }
                return db;
 }

 private DbRegistry getDbRegistry() {
  return new ExampleDbRegistry();
 }

}
Dienstag, 16. September 2014
If the SDK-Manager doesn't start on windows 64x
So I solved it by myself.
If someone have to handle this problem and can't find a solution by using google too, I hope this description will help you.
The problem is described as the following.
By opening the sdk-manager a cmd-console shows up for a moment and nothing happens.
The problem can be solved by editing the android.bat. You found it in your tools folder.
There you will find the following lines:
set java_exe=
call lib\find_java.bat
if not defined java_exe goto :EOF
Here you define the path for java_exe here. So replace this with for example:
set java_exe=D:\java\jre8\bin\java.exe
After you did that have a look at this line:
for /f "delims=" %%a in ('"%java_exe%" -jar lib\archquery.jar')
do set swt_path=lib\%%a
The Windows cmd is not able to invoke the command inside of the bracktes.
I don't know why. If anybody knows, please write a comment.
There you have to replace the code inside of the bracket with: x86_64
for /f "delims=" %%a in ("x86_64")
do set swt_path=lib\%%a
In the last step you have to add a path-variable called ANDROID_SWT which links to folder lib\x86_64 inside of the current folder. For example:
D:\Android\tools\lib\x86_64
Then run the android.bat and the SDK-Manager will be shown up.
Mittwoch, 28. August 2013
Mobile Wettkampfverwaltung - 4. Modul
Download unter: https://play.google.com/store/apps/details?id=com.comphel.KataPoints&hl=de
Funktionsweise:
Die Standardansicht bietet die Möglichkeit 5 Punktwerte zu erfassen (Eingabe ohne Komma - das geht schneller). Mit dem Betätigen der Schaltfläche "Berechne" wird die endgültige Punktzahl kalkuliert. Dabei wird die höchste und die niedrigste Punktzahl außer Acht gelassen.
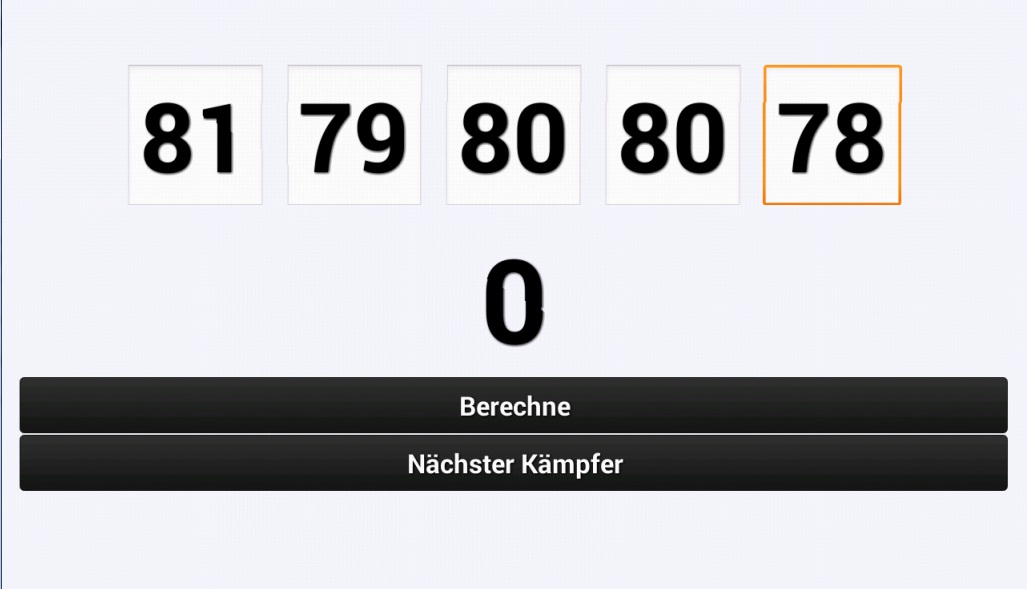
Die außer Acht gelassenen Punktzahlen werden im Anschluss ausgeblendet. Die Schaltfläche "Berechne" ist dann ohne Funktion.

Über die Schaltfläche "Nächster Kämpfer" wird die App komplett zurückgesetzt.

Sonntag, 4. August 2013
Mobile Wettkampfverwaltung - 2. Modul
Wer testen möchte klickt diesen Link an:
https://play.google.com/apps/testing/com.comphel.kumitesettings
Hier eine kurze Vorstellung der momentanen App:
1. Momentane Regeln und Beginn der Einstellung
Nach dem Starten der App sind zwei Tabs zu sehen. In dem ersten Tab befinden sich die eingestellten Regeln zu den Vorrunden. Das zweite zeigt die Regeln für den Finalkampf. Vorrunden und Finalkampf werden einzeln eingestellt. Jeweils das Tab, welches im Vordergrund steht wird durch das Betätigen der Schaltfläche "Begin Configuration" in Bearbeitung versetzt.

2. Einstellung
Nachdem die Einstellung begonnen wurde, können vorerst die zur Verfügung stehende Zeit und die Anzahl der zu erzielenden Waza-aris verändert werden. Betätigt man den nach rechts zeigenden Pfeil kommt man zur Einstellung der Bestrafungen (Jogai, Atenai, Mubobi). Nach einem Überschreiten, der hier eingestellten Anzahl wird der Wettkämpfer disqualifiziert. Gespeichert wird die Einstellung die "Apply". Im Anschluss waltet die App "Shobu-Ippon" nach den eingestellten Regeln.


Das 3. Modul wird die Verwaltung der Wettkampflisten umfassen. Die Wettkämpfer können somit erfasst werden und direkt an andere Module übergeben werden, die dann einen Gewinner evaluieren. Das 3. Modul ist dann dafür zuständig den Verlauf zu bestimmen (Wer kämpft gegen wen?; Wer tritt überhaupt an?; Welches Team hat die meisten Medaillen gewonnen?... - Was die Auswertung angeht bin ich für Wünsche offen)
Dienstag, 18. Juni 2013
Mobile Wettkampfverwaltung - 1. Modul
Weitere Infos auch hier
In diesem Modul wird der Wettkampf im Shobu-Ippon abgebildet. Das bedeutet, dass es sich letztendlich nur um ein Scoreboard handelt, in dem die Regeln vorerst festgeschrieben sind. Die Regeln sollten gemäß denen der IKU sein.
Hier eine kurze Vorstellung der momentanen App:
1. Allgemeine Einstellungen
Zu Beginn werden die Namen der Wettkämpfer eingetragen. Sollten diese nicht bekannt sein, vergibt die App automatisch die Namen Aka und Shiro (den Farben entsprechend). Weiterhin muss festgelegt werden, ob es sich um eine Vorrunde handelt, oder um das Finale, da die Regelungen zwischen beiden variieren. Zwischen beiden Optionen kann man mit dem Betätigen der linken Schaltfläche (unteres Bild) wechseln. Alle Einstellungen werden durch das Betätigen der "Starten"-Schaltfläche übernommen.
2. Verfolgung des Kampfes
Sofern der Kampf beginnt läuft die Uhr. Das bedeutet, dass beim Kommando "Hajime" durch den Hauptkampfrichter, die Schaltflächen "Start" gedrückt werden muss. Die Uhr beginnt dann zu laufen und soll nur durch "Stop" unterbrochen werden, wenn der Hauptkampfrichter das Zeichen dazu gibt. Während des Kampfes werden vergebenen Wertungen, durch Betätigen der richtigen Schaltflächen, der App übermittelt. Je nachdem, ob Aka oder Shiro die Wertung bekommt, sind die entsprechenden, farblich gekennzeichneten Schaltflächen zu betätigen. Ein Ippon kann dabei durch das doppelte Betätigen der großen Schaltfläche übermittelt werden.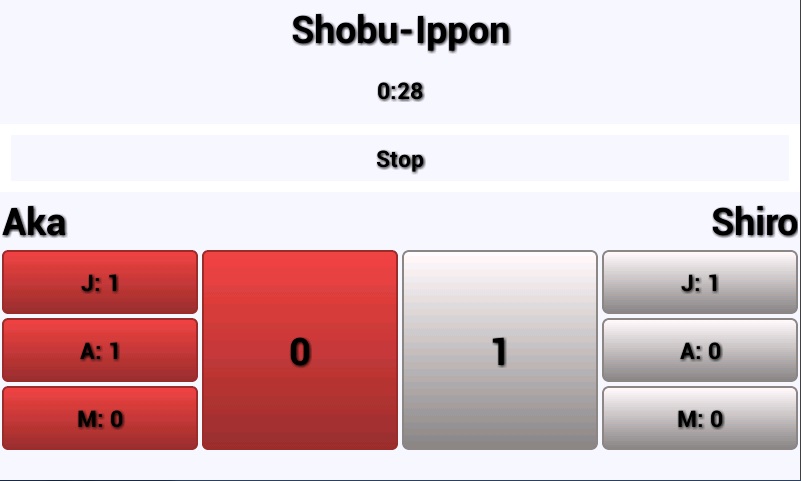
Erklärung der übrigen Schaltflächen:
- "J:" wird bei Verlassen der Kampffläche betätigt
- "A:" wird bei zu starken Kontakt oder mangelnder Kontrolle betätigt
- "M:" wird bei Vernachlässigung der eigenen Sicherheit betätigt
3. Abschluss des Kampfes
Wenn der Kampf durch Ablauf der Zeit beendet wird, müssen die Kampfrichter entscheiden, wer den Kampf gewinnt. Aufgrund dessen erscheint nach Ablauf der Zeit folgender Dialog: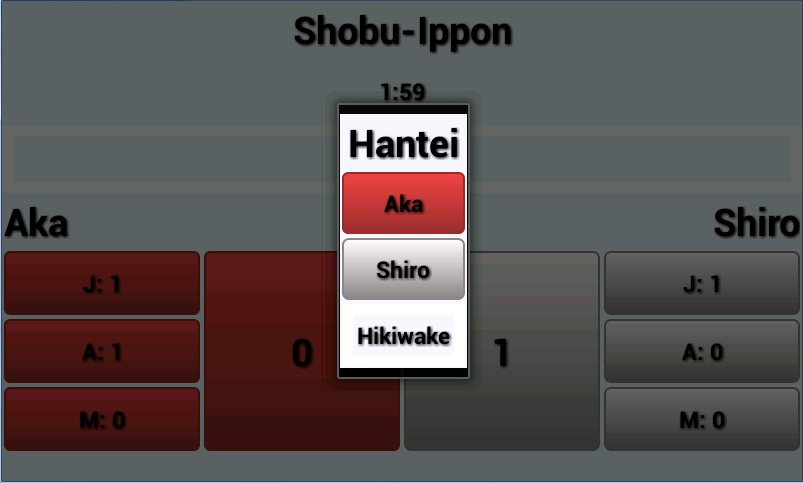
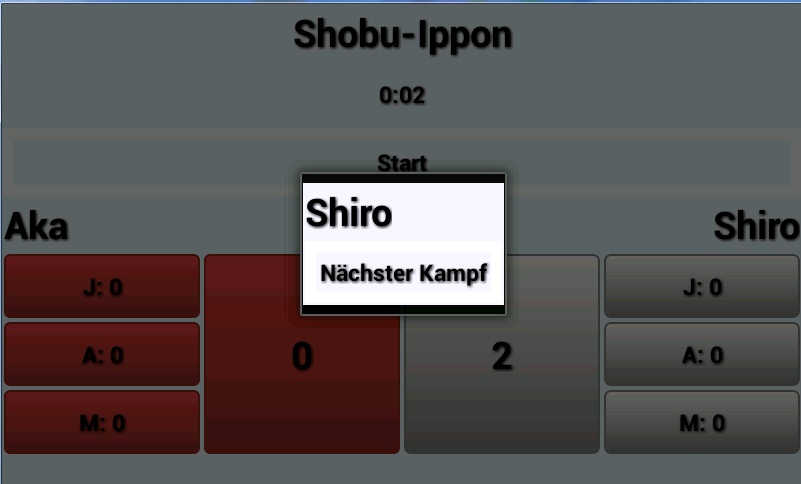
Sollte ein Gewinner bestimmt werden, ist die Schaltfläche des jeweiligen Wettkämpfers zu betätigen. Dies führt dazu, dass das gesamte Prozedere wieder von Vorne beginnt. Ein Unentschieden wird der App durch "Hikiwake" übermittelt. In diesem Fall, bleiben die Namen der Wettkämpfer erhalten und der Kampf beginnt erneut, wobei alle Wertungen entfernt werden. Wenn ein Sieger ermittel ist, erscheint der Name dessen auf dem Bildschirm.
Das nächste Modul soll die Regelverwaltung für den Shobu-Ippon-Wettkampf umfassen. Das ermöglicht dann den Einsatz auf anderen Wettkampfoberflächen.
Abonnieren
Posts (Atom)